 Exchange Outlook Web Access is a wonderful feature, but directing users to access it on their own can be a patience testing proposal if you’re not using URL redirection.
For example: you’ve installed Exchange 2010, configured all the appropriate roles, including the CAS (Client Access Server; responsible for OWA), and deserve a hero’s welcome, or at least a pat on the back. You then send an email to staff telling them that they can access webmail from the following public URL – https://webmail.domain.com/owa; easy enough right? Wrong! A few days later, calls come streaming in with users attempting to access OWA using incorrect URL’s: http instead of https, forgetting to append /owa to the URL, etc.
Well you can clear all of this up and make it transparent to the user, and they’ll never know you did it; it will just work.
With Exchange 2010 and IIS 7, the process for redirection has been greatly improved over IIS 6. Before, I would place a custom page in the “wwwroot” directory that would automatically redirect the user if they didn’t use “https” or if they didn’t append the “/exchange” (Exchange 2000/2003) or “/owa” (Exchange 2007) directory. This was a combination of customizing the “403.4? error and the home directory settings (maybe a later blog post, if requested).
In IIS 7, you only need a few mouse-clicks and your proper OWA URL to accomplish the same thing.
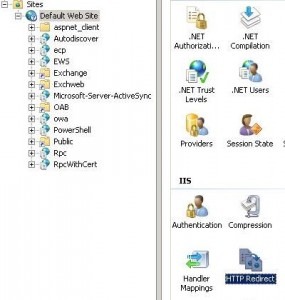
Open IIS 7 manager and navigate to your “Default Web Site“. In the options panel, open “HTTP Redirect“

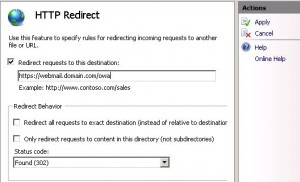
Enter the proper OWA URL (i.e, https://webmail.domain.com/owa) and click “Apply“.

This will apply the redirection to ALL subdirectories of the default site, so you’ll need to click on each subdirectory or virtual directory and remove the redirection by unchecking “Redirect requests to this destination“. We only want to redirect the top level of the default site.

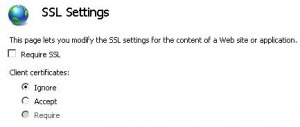
Next, we want to remove the SSL requirement from the default site. Yes we still need to use SSL to access OWA, but if we require it at this level, any user that enters the OWA URL without “https” will receive an error message.

Finally, don’t forget to restart the website and test.

There are some scripts floating out online that will perform these steps for you, such as this one, but I have not had a chance to test, so proceed with caution….and then let me know how it turned out!
